Your Yamaha project
Hi Guys,
As an experienced custom bike builder and lover of the virago's I would love to give you some how to's on building your Caferacer.
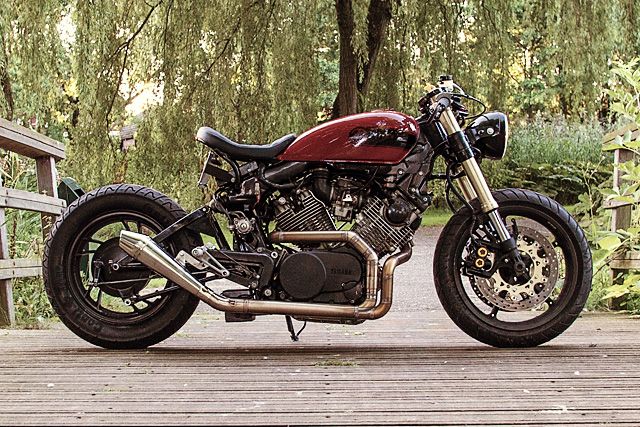
First off is aesthetics because that's why we do what we do;)

You see a lot of Caferacer out there which look great from certain angles but there is something off. Manly this is because of the line between the gastank and the seat. Besides this the angle the bike is in.
It's very important to start with the suspension, if you want to change it. The rear suspension is an easy one. You can get yourself a Hagon or a YSS suspension, make sure you get the right year and type of the bike, they variate, and its plug and play. Don't play with those R1 shocks or something like this. They are not made for these kind of push in/upsidedown work. It will make your Yamaha XV750 xv920 or Tr1 drive like an old Citroën.


The front suspension can be lowered in serveral ways. You can go with the best solution, and replace that old and weak frontend and replace it with a Yamaha R1/R6, Kawasaki ZX9R or Suzuki GSXR frontend or any other modern USD fork. Make sure you choose wishly. The fork variate in length over the years. For instance a Suzuki GSXR 1994 front fork is rather long, and a R1 front fork, especially when you combine it with the R1 wheel, is very low. Your bike can hit the ground when encounter a hole in the road.

Don't cut and shorten or give extra length to the big pin to change the front fork. You can push out the original pen of the xv to adjust into the triple tree of the new fork or you can purchase these parts: Cognito moto
Note this swap of parts is a PRO level. Don't try it if you are not sure what you are doing. Could easily end up with ending you life.
Another, read cheaper, solution is to shorten the front suspension. There is only one way to do so, this is to add a tube inside the low part of your suspension. Don't try to cut and weld the top parts together. I have seen this before and it's just plain stupid;) This video shows you how to do it the right way: Moto Pilot
Okay now we have a proper start of the project!
Next up is making a decision of you would like to go with clip ons or a raised handlebar. I have made over 200 custom bikes with my former company www.motoadonis.com. A lot of customers choose the clipons for the looks, however, almost 99% came back with my hand hurts, my shoulders hurt, I don't feel comfortable riding in this position. It feels okay at first but because you have to twist your hand for throttle everything hurts while driving. For the looks it's great but besides that I wouldn't choose it. Bear in mind that if you like to change it later on it's a lot of work: wiring, throttle cable, brakelines, clutch cable, choke cable.

Okay, well that's settled, now on to the gastank and seat position. The best way is to lean a little forward, if you make it straight you will feel the seat going down when you sit on it. Second is how far the gastank goes up front. In my opinion, the closer to the forks, the better, as long as you keep your steering free of the tank.

I love it when the seat and gastank can get one straight, but little bit leaning forwards line at the underside. it can be nice if the seat is lower than the gastank but then it needs to follow a line of the gastank as well. Another important thing (and most people forget it) is to align other parts of the bike when you make the gastank/seat postion. For instance the front fork and the front of the gastank. Our MAD-exhaust systems and the line of the gastank. They can be different aslong as it connects with one other item on the bike.

By the way, feel free to leave comments if you have any. I’m writing this to help out the less experienced builders.
The gastank is something, on some models, everybody wants to change. This can be an easy fix and it can give you a headache. It all depends on the preparation or your skills.
With the preparation I mean the measuring of the frame and the funnel of the gastank. If it doesn’t fit the frame easily it can be a bitching work to change it. Especially with the Yamaha virago frames but also the very wide frame like the BMW k100 and K75 or the Honda cb750 / cb900. There are some gastank that fit quite nicely. The old Bmw gas tanks from the BMW R80 or R100 mono shock, the benelli gas tanks of course, the do need some welding for mounting but looks rad if you ask me. The honda cb gastank, the Triumph bonneville tank. For instance the BMW R80 gastank from before 1980 you have to modify heavily to make it fit. Can be done but its a bitch;)
If you really got the skills its best to cut out the old funels and make a new one that fits the frame and gastank perfectly. This also gives you the benefit to clean the old gastank from the inside.
In all cases make sure you put the gastank on a leak test just before painting. You wont be the first with a small leak that damages your freshly painted gastank.
You have now put a spot on gastank on the bike. You can choose to buy yourself a prefab frame (and seat) and mount it on your virago. There are a lot of seats and frame to be bought. For instance at caferacerwebshop
If you like to give your bike a more unique look you might be better of building something from scratch. I personally preferred round tubes which I bend by hand. I used a lot of tubes 2mm thick and 22 mm in diameter with no welds. These can be bought at your local metal distributor. There are a lot of ways to do this. I started with just a big ass tube to put in the bank clamp and pulled the tube around it. This was a way to make custom frames like no one else. Later on I bought a professional tube bender and although I could get less creative, my frames were always straight on the first attempt (which makes it more profitable when you make 60 bikes a year;)).
After making the frame for your custom Yamaha TR1 or XV750 or XV920 you can start on making the seat. There are many ways to do it, I always took a 2 mm thick steel plate and draw the frame on it. Cut it out and mounted it on the frame. Then to have a perfect connection to the gastank, I made a plate 1mm of the gastank (leave space for the leather) and make sure it followed the gastank as perfect as possible. My main upholstery dude was Miller Upholstery in Zutphen. This guy can make almost any shape and style you want for fair prices and high quality (ships wold wide).
Now the seat and gastank are complete. On to lights and other small stuff.
There is a lot on the market to purchase. You can buy a lot on Alibaba or such or you can go for quality like Moto Gadget or Koso or Kellerman
I know it’s a lot of money but the quality of one of these products is outstanding. It the difference between our MAD-exhausts (which last a lifetime) or the Chinese steel garbage that you can by on alibaba or brands who’s name I wont mention. If you want to build a quality project which gives you a lot of pleasure for a decade and still be worth something when you want to sell it, don’t safe money on these parts. (Of course the exhaust has priority;))
The wiring of the Yamaha virago’s is 30-40 years old. You can change it and reuse parts of the wiring ( I have done it a lot and no troubles) or you can rewire everything. There is one guy who made your job easier and that is a guy named Manfred. He has the original wiring schematics and also a cleaner version because lets face it, you can do it without half of the wiring that came stock in those bikes. Another possibility is to change everything to Moto Gadget M-unit. I love the Bluetooth version of it because it makes wiring easy, it gives the opportunity to make the handle bar super clean and still maintain all functions and it comes with GPS, track n trace, keyless starting and alarm function.
If you are redoing the wiring, you will need a few basics. Some wiring cables are handy;) some textile black tape, soldering device and shrink tubes. You can also work with some waterproof connectors. For instance this one from BANGGOODS. Or you can go for a cheaper and definitely not a worse solution like this guy from ThemotorcyclesMD explains.
The best way is just to start all over and go step by step. I always started with the battery to the startrelais from there a fuse and then to the ignition key. From the ignition key you now have a switched + which you need all the way through. I always made 3 Fuses after this. One for all the power the engine needs, one for the lights and one for accessoires. You can go from here to the ECU and the dynamo. Follow the instructions of the wiring schematics to make sure you have everything by the book. It’s good to maintain the same coloring, if you every have any problems you can easily trace it back.
For the lights you might need a LED blinker relais. This allows you to have a normal blinker speed after you changed your big Yamaha virago blinkers for nice small ones.
Hey Mr gearhead you wouldn’t happen to know what kind of jet should put in a 94 virago xv1100 at 8,500 FT with Lance pipes and a k&n air filter would you ???I’ve been messing around with this thing forever and close as I can tell the factory stuff works the best but I don’t know it’s aggravating !! love the bike if I could get it run perfect to be a lot funner seems to be burning rich but more I lean it out the shittier it runs anyway thanks for your time
Great info! Thank you so much!
Thanks for sharing this website. Lots of great tips. I’ll be looking for some YSS suspension. Which type exactly for an 82 Virago XV